Step 4 – Usage of playbooks and modules
Note
The configuration files and playbooks can be downloaded using the download section on the upper rights side of this page, or with this button:
Download
Having achieved connectivity using Ansible, we will now discuss the modules and playbooks that we will use to amend the configuration as we discussed in the
introduction. (For an explanation on modules please revisit chapter 6)
To streamline the commands that need to be used, we will use Ansible Galaxy. To find any relevant modules simply go to
galaxy.ansible.com search for cisco. This returns multiple modules and collections provided by Cisco.
We will use the collection cisco.IOS . To install this collection go to your Ansible host machine and, using the CLI, enter the following command:
ansible-galaxy collection install cisco.IOS
ansible-galaxy collection install cisco.IOS
The addition of this collection will change the way we configured Cisco devices (as described in Chapter 9) to a more specialized way of doing instead of
the broad commands that were available with IOS_config.
What we want to achieve with Ansible playbooks is idempotency. Idempotency means that whatever function you call it will always provide
the same result without fault. To explain it with a simple mathematical example – think of multiplication by zero. It doesn’t
matter how often you will do it, the result will always remain the same zero.
With automation you don’t want to configure every device separately,
that wouldn’t save you any time at all, but instead you want to be able to send a task to multiple machines at once, where the tasks are repeatable but
the result will stay fixed the results still being the same wherever the tasks are executed.
And that’s exactly what we’re trying to achieve with the new configurations for the network devices.
To recap what we needed to do from the introduction step. We need to implement a new Banner message, set up ACLs, configure VLANs,
install and the implementation of SNMP.
Basic system configuration
Starting off with the banner. The banner is something that’s company-wide for the majority of devices.
For a banner we can make a playbook that will use all the hosts from our inventory file.
And because we installed the cisco.IOS collection it might be a good idea to check the modules included, to see if there are any specific modules that will
help us with the setup.
This can be done by revisiting Ansible galaxy website and following the links provided until the GitHub explanation of provided modules or by visiting
https://github.com/ansible-collections/cisco.IOS/tree/main/docs .
Using the explanation provided in the GitHub docs and combining it with the examples provided from Cisco we can now easily make a playbook that will be
idempotent and will satisfy our needs.
---
- name: Configure default info on all devices.
  hosts: all
  tasks:
  - name: Configure hostname and domain name.
    cisco.ios.ios_system:
    hostname: "{{ inventory_hostname }}"

  - name: Configure motd banner.
    cisco.ios.ios_banner:
    banner: motd
    text: |
      This device is for authorized personnel only.
      If you have not been provided with permission to
      access this device - disconnect at once.
    state: present

  - name: Configure login banner
    cisco.ios.ios_banner:
    banner: login
    text: |
      *** Ensure that you update the system configuration ***
      *** documentation after making system changes.      ***
    state: present
To reiterate what is happening in this playbook we will go through it line by line. Or you can revisit Chapter 4 and learn more about playbooks in detail.
table 2. Explanation playbook banner
Configuration
|
Explanation |
- name
|
The name to identify what our playbook does |
| hosts: all |
In this case all hosts contained in our inventory file |
| - name |
Name of a specific task (will be included in the output window) |
| cisco.ios.ios_banner |
Name of the module used – when specified all its commands can be used below in the same task |
| banner: login |
Specifies which banner should be configured on the remote device. In Ansible 2.4 and earlier only login and motd were supported |
| text: |
The banner text that should be present in the remote device running configuration. This argument accepts a multiline string, with no empty lines. Requires state=present |
| state: |
Specifies whether or not the configuration is present in the current devices active running configuration |
Running this playbook would configure the hostnames and domain name. These names are defined in the inventory file.
The output of the playbook would look like the following image.
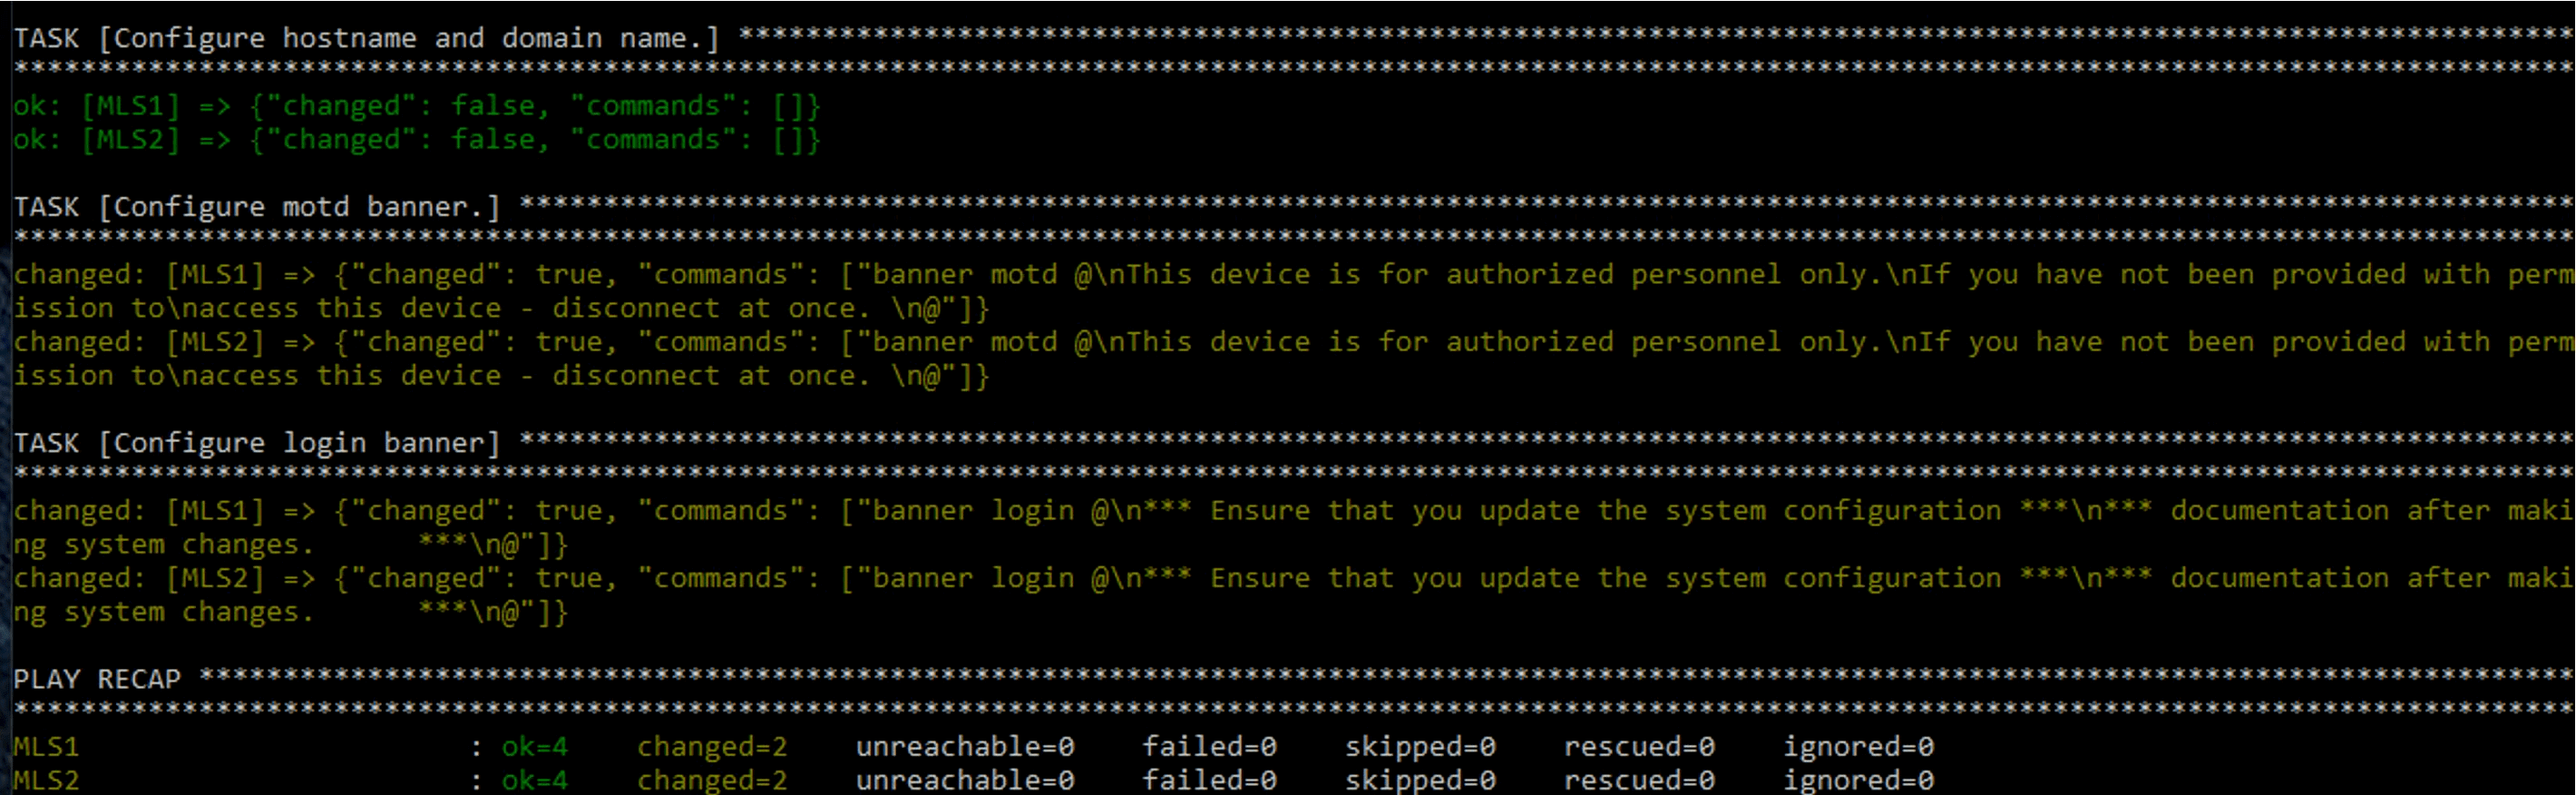
img 2. Output playbook default information devices
Access control lists
Next on our list are the ACLs. Every network needs some form of security and in our case we will place the ACLs on the Distribution Layer Switches which are L3 switches.
Unlike the previous playbook we will now specify just one group with the ACLs allowing for an SSH connection to or from the 10.1.1.0, 10.1.2.0 and 10.1.3.0
networks.
We will accomplish this using the cisco.ios.ios_acls module.
---
- name: Overwrite all ACL configuration.
hosts: L3Switches
  tasks:
  - name: Merge provided configuration with device configuration
    cisco.ios.ios_acls:
    config:
    - afi: ipv4
      acls:
      - name: std_acl
      acl_type: standard
      aces:
      - grant: deny
        source:
        address: 192.168.1.200
      - grant: deny
        source:
        address: 192.168.2.0
        wildcard_bits: 0.0.0.255
	state: merged
Notable differences from the breakdown of our previous playbook are listed in the table 3 below.
table 3. Explanation playbook ACL
Configuration
|
Explanation |
hosts: L3Switches
|
Use all hosts from L3Switches group |
cisco.ios.ios_acls
|
A more general use module focused on line configuration
|
| - afi |
The Address Family Indicator (AFI) for the Access Control Lists (ACL). This can be IPv4 or IPv6 |
| grant |
This specifies the action. It can be permit or deny
|
Virtual Local Area Networks
Going further down the list we arrive at VLANs. As our company uses two VLANs it is imperative that the switches know of them and are
able to transfer the frames tagged with those VLAN-IDs.
This time we only need to make these changes on the Layer 2 switches. So our goal is to create two new VLANs on each of the layer 2 switches and
set the interfaces to access mode for the correct interfaces. As previously mentioned during the banner setup it’s always a good idea to check whether or
not your collection has modules specialized for your tasks which helps with idempotency and most of the time makes it an easier and clearer to read playbook.
The cisco.ios collection also provides us with an ios_vlans and ios_l3_interfaces module.
These modules simplify the actions we need, and are easy to use owing to the well documented module information on the GitHub page of the collection with examples.
Having a clear goal and the help of the documentation we can now write our playbook containing 3 tasks. Creation of the first VLAN, second VLAN and lastly setting
up the access mode on the interfaces for our VLANs.
---
- name: Set vlans
hosts: L2Switches
tasks:
  - name: Delete old vlans
  cisco.ios.ios_vlans:
    config:
    - vlan_id: 10
    - vlan_id: 20
    - vlan_id: 30
    state: deleted

  - name: clear interfaces
  cisco.ios.ios_l2_interfaces:
    config:
    - name: FastEthernet0/0
    state: unconfigured
    - name: FastEthernet0/1
    state: unconfigured
    - name: FastEthernet0/2
    state: unconfigured
    - name: FastEthernet0/3
    state: unconfigured
    - name: FastEthernet0/4
    state: unconfigured


  - name: Delete virtual interfaces
  cisco.ios.ios_l3_interfaces:
    config:
    - name: vlan10
    - name: vlan20
    - name: vlan30
    state: deleted

  - name: Create vlan
  cisco.ios.ios_vlans:
    config:
    - name: Users
    vlan_id: 10
    state: active
    - name: Servers
    vlan_id: 20
    state: active


  - name: Merge provided configuration with device configuration
  cisco.ios.ios_l3_interfaces:
    config:
    - name: vlan10
    ipv4:
    - address: 10.0.3.1/24
    - name: vlan20
    ipv4:
    - address: 10.0.4.1/24

  - name: Configure interfaces
  cisco.ios.ios_l2_interfaces:
    config:
    - name: FastEthernet0/0
    mode: trunk
    native_vlan: 10
    trunk_allowed_vlans: 10,20
    - name: FastEthernet0/1
    mode: trunk
    native_vlan: 10
    trunk_allowed_vlans: 10,20
    - name: FastEthernet0/2
    mode: trunk
    native_vlan: 10
    trunk_allowed_vlans: 10,20
    - name: FastEthernet0/3
    mode: trunk
    native_vlan: 10
	trunk_allowed_vlans: 10,20
With this we should be able to differentiate between each line of the playbook noticing the group change,
different modules used their breakdown as it looks almost identical as to what you would normally write on your switch but slightly more organized.
The output of the VLAN playbook should give you the output as in the following image.
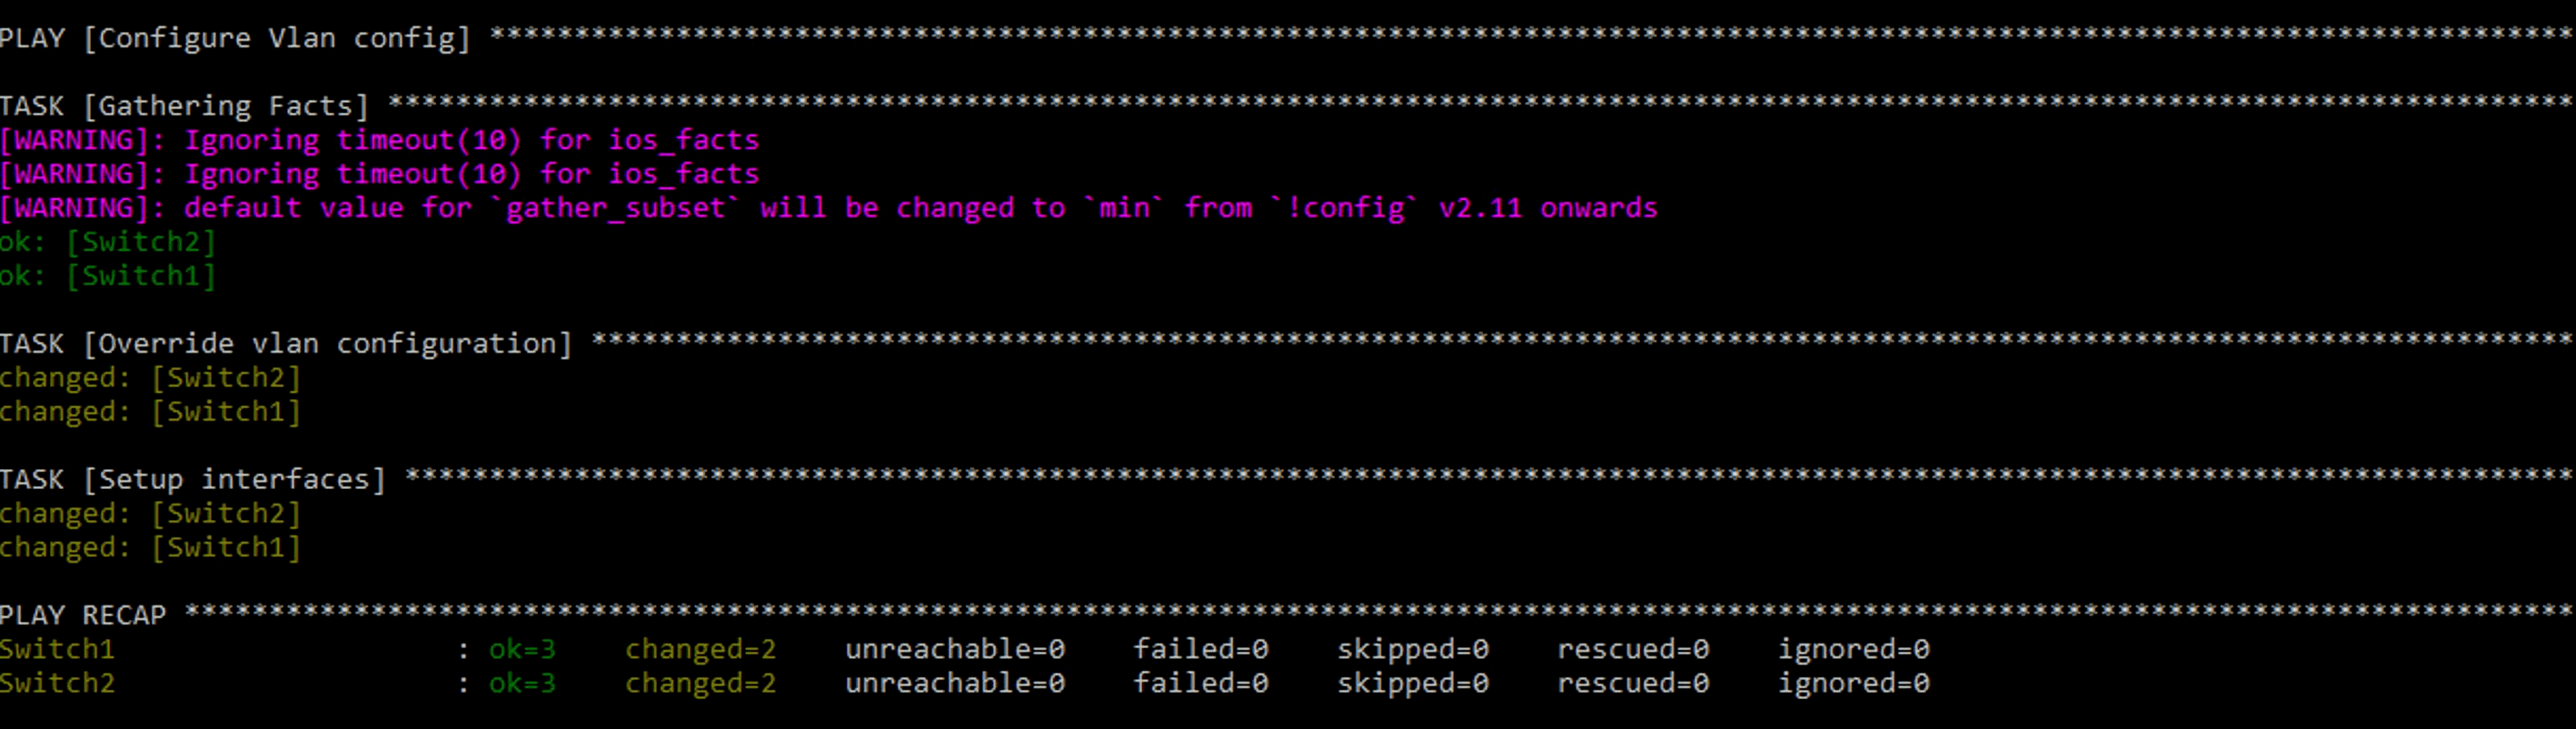
img 3. Output playbook VLAN
Simple Network Management Protocol
Lastly we will create a playbook that checks for SNMP and collects the data, removes it and installs the newest version.
Seeing as Ansible works with a push model and each of our goals needs different results we will have to
split each of our planned actions into different playbooks.
“Company A” as many other companies values data and wants to be up to date on the state of its devices to diagnose and improve over time.
The usual configuration that they have runs on SNMP version 3. It is important to first check for the current diagnostics data and
then upgrade the SNMP version that is set up on the new devices as they might have an older version configured.
While there is an SNMP specific module in the cisco.ios collection, the same idea as with ACLs applies.
The cisco.ios.ios_config module provides an easy way to visualize and manage SNMP, as opposed to SNMP in the SNMP specific module.
So to check whether or not the devices are configured with SNMP we will run a show run command that grabs the lines which include
“snmp-server” if they exist at all and show them directly in the output screen of the CLI on the Ansible host.
To do this we should write the following playbook:
---
- name: Get SNMP data from all devices.
  hosts: all
  tasks:

  - name: Get SNMP data from running config.
    IOS_command:
    commands:
      - show running-config | include snmp-server
    register: if_data

  - name: Show SNMP data from running config.
    debug:
	var: if_data['stdout_lines'][0]
Now while this playbook looks quite similar to the ones we’ve used before there are a few small additions which are explained below.
table 4. Explanation playbook SNMP
Configuration
|
Explanation |
Register: if_data
|
Register saves data output as a variable. |
Debug:
|
Prints statements during execution
|
Var: if_data[’stdout_lines’][0] |
The Variable “if_data” procured from register are put on screen thanks to the stdout_lines |
Having this done and received data, we now know that there is an SNMP server configured on one/several of our devices which means
that we can proceed to the removal. In case we haven’t received any data output we can instead proceed to the installation of SNMPv3.
The removal of SNMP is quite simple and possible the easiest playbook yet in our walkthrough. As usual you want to open your text editor
in the CLI of your Ansible host and type / copy the following in:
---
- name: Remove any SNMP configuration.
  hosts: all
  tasks:
  - name: Clear SNMP configuration.
    IOS_config:
    lines:
	  - no snmp-server
As we can see there was nothing new in this playbook as far as complexity goes which is good as the task itself was simple and shouldn’t
be made complicated. Now it’s time to save it and run again by typing the following command:
Ansible-playbook play_name.yml
In case data was received the first time we ran our Check SNMP playbook, we can run it again to double check if there is still data showing up which
shouldn’t be there in this case.
And last but not least we have to configure SNMPv3. Now that we know for sure that none of our devices are configured with SNMP we can
finally set it up to our needs. We will configure it to our needs with password authentication, version 3 and traps centred around OSPF and VLANs.
We will also add a new feature to our Cisco playbook where the running config will be saved to the start-up configuration when modifications occur.
---
- name: Configure all devices with SNMPv3.
  hosts: all
  tasks:
  - name: Configure SNMP V3.
    IOS_config:
    lines:
      - snmp-server engineid remote 10.0.2.1 446172742E506F776
      - snmp-server user ADMIN ADMINGROUP v3 auth md5 AUTHPASS priv aes 128 PRIVPASS
      - snmp-server group ADMINGROUP v3 priv
      - snmp-server host 10.0.2.1 traps version 3 priv ADMIN
      - snmp-server enable traps vlancreate
      - snmp-server enable traps vlandelete
      - snmp-server enable traps ospf
      - snmp-server enable traps ospf errors
  - name: save running to startup when modified
    cisco.IOS.IOS_config:
	  save_when: modified
As previously explained we use IOS_config for simplicity and a neat code. The two noticeable changes this time come in the name of modules and
the new task which helps with the longevity of your changes by saving your configuration in start-up config therefore not being reset by a reboot as
would be the case with regular running config.
You may have noticed that we used the IOS_config module initially, followed by the cisco.IOS.IOS_config module.
These are essentially the same if a newer version of Ansible is used, however if an older version of ansible is used it might be impossible
to run only IOS_config, as abbreviations were not fully supported yet.
The second change is the second task which saves the running configuration to start-up configuration when there were any modifications.
A simple and small task but definitely really important when you want your changes to be more than just temporary.