Considering Ansible Vault
When starting off with Ansible Vault, it’s important to understand why someone would choose to use this.
Whilst it’s not recommended for your run-of-the-mill quick test lab. The moment you want to take your Ansible use to the next level there will be some confidential information you might not want to share or have someone take advantage of in case the project gets leaked.
Therefore, Ansible created Ansible VAULT: This is a tool that enables their users to encrypt their playbooks and password-protect them as its main feature. The other notable feature is encrypting specific variables inside your YAML files.
Warning
While ansible vault offers encryption it’s not an end-all be-all solution as you will still be asked for your password and/or the file containing your password. If you want your network to be secure it is still recommended to take the extra necessary measures.
Using Ansible Vault
Tip
When running ansible vault commands from the CLI it is recommended to first edit your $EDITOR environment variable to the one you’re most comfortable with inside of your .bashrc file.
To check which editor is your default type in echo $EDITOR. Alternatively you can also use EDITOR=nano ansible-vault edit example.yml to edit an encrypted file.
To start/enable this feature it is required to type the following command inside of your command line window: ansible-vault.
Followed by one of its uses directly after prompting for a password (or the password file location).
- Encrypt example.yml - This encrypts an already existing file.
- Decrypt example.yml - This decrypts an already existing file.
- Create example.yml - Creates an encrypted file.
- Edit example.yml - Only way to edit a file which has been encrypted by Ansible vault – see above TIP for inline editor change.
- Rekey example.yml - To change the original password – you will be prompted first for the original before the new one.
- Encrypt_string - This encrypts a specific variable.
- View example.yml - To view an encrypted file.
Warning
Once you lose your password you will also lose the data, so proceed carefully.
If everything went correctly, and you’d like to use an encrypted playbook instead of using Ansible-playbook example.yaml.
To run the file, you will now have to provide the ansible with a password or a password location to be able to run the playbook and this would be done by
adding --ask vault pass at the end of your command forming ansible-playbook example.yml --ask-vault-pass for the password prompt version.
And --vault-password-file pass.txt at the end of your command forming ansible-playbook --vault-password-file pass.txt for the password file version
which doesn’t require any further actions from the user. However, doing so will leave the password file unencrypted so at the very least it is recommended to change the user
rights on it with chmod 400 pass.txt so that only the file owner has read only access to it.
Note
The following explanation is for Ansible 2.4+ only
Lastly there is one more option to store and retrieve your vault passwords assuming you run Ansible version 2.4 or higher; Vault ID’s.
Before I continue with the explanation on how to set them up, I’ll describe how to use the password to finish of the quick overview.
To use an ansible vault id password you must type in the following: --vault-id passfile1@vault1 at the end of your command forming
ansible-playbook example.yml –vault-id pass1@vault_pass_file.txt for the vault id version. Do note that using vault id you can have multiple passwords inside of 1 file.
The needed password is specified with “pass1” In this case from the “vault_pass_file.txt” file. In case you’d like to enter the password manually you can also use –vault-id pass1@prompt to be prompted for the file.
And now for the actual explanation of Vault IDs:
Simply Vault IDs provide a way to identify passwords from a source thanks to a label.
[defaults]
inventory = inventory
remote_user = root
vault_identity_list = inline@~/ansible/.inline_pass , files@~/ansible/.files_pass
--vault-id label@source in this case ansible vault would look for a password labeled “label” in a file called “source”. Alternatively, you can use --vault-id label@prompt to have Ansible prompt you for the password.
However, it is not enough to type in the above code snippets as Vault IDs need to be preconfigured in your ansible.cfg file before use.
As an example, we have 2 password files declared here: inline and files at their corresponding locations. Both contain an unencrypted passphrase with the password and will have to be called using inline@prompt or inline@file_source (~/ansible/.inline_pass)
Encrypt_string output breakdown
Seeing as the encrypt_string output might be confusing at first, we will also explain what all the visible variables mean from the initial code snippet to the output.
ansible-vault encrypt_string --vault-password-file pass.txt 'testing' --name 'secret_password'
Secret_password: !vault |
  $ANSIBLE_VAULT;1.1;AES256
  62313365396662343061393464336163383764373764613633653634306231386433626436623361
  6134333665353966363534333632666535333761666131620a663537646436643839616531643561
  63396265333966386166373632626539326166353965363262633030333630313338646335303630
  3438626666666137650a353638643435666633633964366338633066623234616432373231333331
  6564
Breakdown
- The variable name secret_password, followed by !vault |, indicates that the vault is encrypted.
- The vault version that supports the vault ID is 1.1.
- The AES cipher in 256 bits is represented by AES256.
--vault-id example
ansible-vault encrypt_string --vault-id test@source 'testing' --name 'secret_password'
Secret_password: !vault |
  $ANSIBLE_VAULT;1.2;AES256;test
  30613233633461343837653833666333643061636561303338373661313838333565653635353162
  3263363434623733343538653462613064333634333464660a663633623939393439316636633863
  61636237636537333938306331383339353265363239643939666639386530626330633337633833
  6664656334373166630a363736393262666465663432613932613036303963343263623137386239
  6330
Breakdown
- The variable name secret_password, followed by !vault |, indicates that the vault is encrypted.
- The vault version that supports the vault ID is 1.2.
- The AES cipher in 256 bits is represented by AES256.
- The vault ID in use is test.
Tip
To speed up the decryption process at startup it is recommended to install the cryptography package using pip install cryptography
Considering Ansible Galaxy
As promised at the beginning of this chapter we will also look at something that might help you speed up the process of automation. we're talking about Ansible Galaxy of course.
Ansible Galaxy is a community driven tool. Or rather a repository of community made roles and collections for all your automation needs.
The reason you may want to consider using the resources provided by Ansible Galaxy is quite simple: Time.
Every time we come up with the need to automate we tend to be either short on time or not knowledgeable enough of the subject to be efficient in the process.
That’s where something like a community made resource can come in handy as a reference or a quick and dirty way to see how far along you are with your test environments without the need to start from ground up.
Warning
Ansible galaxy provides community driven resources therefore we advise to either read and edit the files you download and or run them first in your test environment before you deploy them in your production environment.
Finding content on Ansible Galaxy
There are 2 main ways to search for content available on Ansible Galaxy:
- Using the Command Line Interface
- Using the Web Interface
Using the Command Line Interface
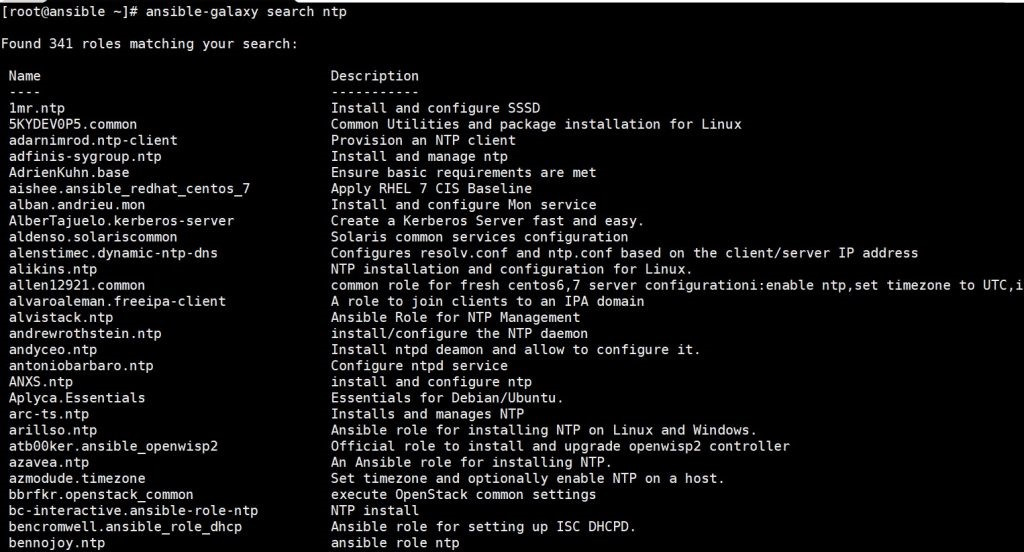
CLI is the quick and dirty way seeing as it doesn’t provide detailed information (right of the bat) except for the provided description and the name of your search. The way to do this is as follows:
On the machine you’ve downloaded and installed Ansible you type in:
ansible-galaxy search xxxx(substituting xxxx for your search).
As a general rule of thumb the Top results will show you the most popular and therefore (more often than not) most robust roles.
Of course, it is not impossible to get more information and following the example of a NTP ansible galaxy search we’ll show you the steps.
First of all, you want to find a suitable NTP role you’d want to install/download:
Following that you’d type in the following in your CLI:
ansible-galaxy info xxxx (Substituting xxxx for the name of your search – bennojoy.ntp for out example).
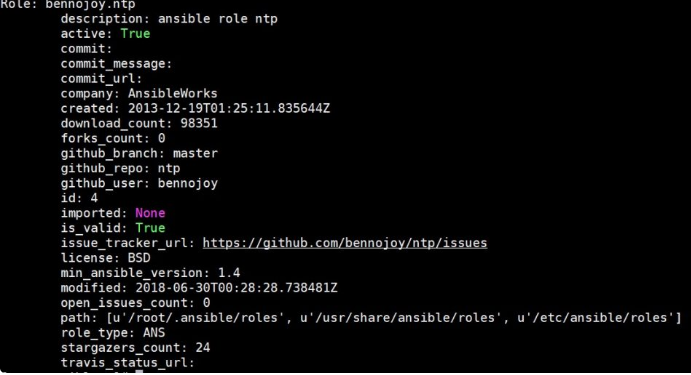
And by repeating these 2 steps you can get to know what your search is all about and on which versions it works.
Using the Web Interface
Now the other way is to use the Ansible Galaxy website
This way you can search by:
- Type - e.g Development, Networking etc.
- Keywords - Through plain search
- Community authors - For your trusted authors and their commits
- Partners - Not a standardized option but available through the Partner Website
Whilst the end results would be the same with a list of search results you will also be provided with some additional information like the amount of downloads, community score,
whether the code compiles, and the last time it was imported. With even more detailed information once the search result is clicked and links to GitHub so that you can first investigate the resource before you download it.

As with every previous theme around Ansible Galaxy installation and usage is simple and fast.
Ansible Galaxy is installed by default with your Ansible installation and to install a role you’ve found you simply need to type in the following in your CLI:
ansible-galaxy install contributor_name.role
Note
All Ansible Galaxy roles will be stored in /etc/ansible/roles directory by default. To change the directory in which the roles are installed you need to modify your installation command to:
ansible-galaxy install --roles-path ~/ansible-roles contributor_name.role
Or by modifying the ansible.cfg file
roles_path variable.
- Installing a specific version by adding a coma and the version number as stated below
ansible-galaxy install geerlingguy.apache,v1.0.0
Installing a specific GIT commit by following install with git+branch name orgit+commit hash
ansible-galaxy install git+https://github.com/geerlingguy/ansible-role-apache.git,0b7cd353c0250e87a26e0499e59e7fd265cc2f25
Installing multiple roles from one or multiple files
To do this you’d make a file named requirements.yml with .yml or .yaml extension. And execute the following command:
ansible-galaxy install -r requirements.yml
Below you can find an example requirements.yml file referenced from the Galaxy documentation.
Tip
To list your installed roles type in: ansible-galaxy list
# from Galaxy
- src: yatesr.timezone

# from GitHub
- src: https://github.com/bennojoy/nginx

# from GitHub, overriding the name and specifying a specific tag
- src: https://github.com/bennojoy/nginx
	version: master
	name: nginx_role

# from a webserver, where the role is packaged in a tar.gz
- src: https://some.webserver.example.com/files/master.tar.gz
	name: http-role

# from Bitbucket
- src: git+http://bitbucket.org/willthames/git-ansible-galaxy
	version: v1.4

# from Bitbucket, alternative syntax and caveats
- src: http://bitbucket.org/willthames/hg-ansible-galaxy
	scm: hg

# from GitLab or other git-based scm
- src: git@gitlab.company.com:mygroup/ansible-base.git
	scm: git
	version: "0.1" # quoted, so YAML doesn't parse this as a floating-point value
Now seeing as this block has multiple variables added to the roles we will now go through them:
- Src - Source of the role and its required attribute.
- Scm - If the src field is a URL it needs to be specified with either git or hg. The default is set to git.
- Version - Version of the role. The following options are possible: tag value, commit hash or branch name. The default is set to master.
- Name - To override the name with which the role is installed.
And to install the roles from multiple files you’d have to edit your requirements.yml file with an - include: [path_to_requirements]/additions.yml whereby additions.yml file would have the same structure as requirements.yml.
To proceed with the installation, you’d simply provide the root file – in our case requirements.yml – with the same command as stated for singular installations.
ansible-galaxy install -r requirements.yml
Note
Some roles are dependent on other roles which are automatically installed. To view these dependencies please consult your /meta/main.yml file of your role. They will be listed below the dependencies keyword.
And last but not least if you wish to remove a certain role you can proceed with that using the following command: ansible-galaxy remove role1 role2 with role1 and role2 being the names of the roles you wish to remove.
Contributing content
The last topic around Ansible-Galaxy that we’re going to explore is the creation and contribution of content.
Which will also introduce the last of the most common commands used with Ansible Galaxy init.
For example, if you’d decide to create a new role the command, you’d be looking for is:
ansible-galaxy init my_new_role
By doing this ansible-galaxy will create a new directory structure for you called my_new_role.
Which would contain the following tree:
|.travis.yml
|README.md
|defaults
| | main.yml
|files
|handlers
| | main.yml
|meta
| | main.yml
|tasks
| | main.yml
|templates
|tests
| | inventory
| | test.yml
|vars
| | main.yml
Note
For a more detailed explanation on the directory structure please re-visit Chapter 5 of our manual.
Once you populate your role with the desired configurations the next step you will need to take is to populate the metadata of your role.
Seeing as Galaxy takes a look into your metadata file for all its content information it is important to populate it as fully and concise as possible.
You can find the default metadata file created by init command below.
galaxy_info:
 role_name: foo
 author: your name
 description: your description
 company: your company (optional)

 # If the issue tracker for your role is not on github, uncomment the
 # next line and provide a value
 # issue_tracker_url: http://example.com/issue/tracker

 # Some suggested licenses:
 # - BSD (default)
 # - MIT
 # - GPLv2
 # - GPLv3
 # - Apache
 # - CC-BY
 license: license (GPLv2, CC-BY, etc)

 min_ansible_version: 1.2

 # If this a Container Enabled role, provide the minimum Ansible Container
 # version.
 # min_ansible_container_version:

 # Optionally specify the branch Galaxy will use when accessing the GitHub
 # repo for this role. During role install, if no tags are available,
 # Galaxy will use this branch. During import Galaxy will access files on
 # this branch. If Travis integration is configured, only notifications for
 # this branch will be accepted. Otherwise, in all cases,
 # the repo's default branch (usually master) will be used.
 # github_branch:
 #
 # platforms is a list of platforms, and each platform has a name and a
 # list of versions.
 #
 # platforms:
 # - name: Fedora
 #   versions:
 #   - all
 #   - 25
 # - name: SomePlatform
 #   versions:
 #   - all
 #   - 1.0
 #   - 7
 #   - 99.99

 galaxy_tags: []
  # List tags for your role here, one per line. A tag is a keyword
  # that describes and categorizes the role. Users find roles by searching
  # for tags. Be sure to remove the '[]' above, if you
  # add tags to this list.
  #
  # NOTE: A tag is limited to a single word comprised of
  # alphanumeric characters.
  #       Maximum 20 tags per role.

 dependencies: []
  # List your role dependencies here, one per line. Be sure to remove the '[]'  # above,if you add dependencies to this list.
Whilst most of the information in your metadata file is optional the only required field is Platforms. In which you need to provide the platform that is compatible with your role and the versions you’ve tested on.
All the other fields are optional. After which you can upload your file to GitHub or Travis and from there import it to your Ansible Galaxy account.
The other “thing” you can create and share is your Playbook bundle. The principle is mostly the same with the command changing slightly to:
ansible-galaxy init –type apb my_new_apb
Following this command Ansible will create a directory named my_new_apb containing the following:
|.travis.yml
|Dockerfile
|Makefile
|README.md
|apb.yml
|defaults
| |main.yml
|files
|handlers
| |main.yml
|meta
| |main.yml
|playbooks
| |deprovision.yml
|provision.yml
|tasks
| |main.yml
|templates
|tests
| |ansible.cfg
| |inventory
| |test.yml
|vars
| |main.yml
And as with roles once you’re satisfied with the content you’ve written out in your playbook it is mostly important to populate your metadata file with all the relevant information so that the community has an easier time finding it.
Note
For the more advanced users RedHat also provides the “Red Hat Ansible Automation” subscription. Which contains certified and maintained roles, playbooks and newly added collections.
Collections are basically fully functional environments with sample playbooks roles and scripts ready to go for your needs. The prices range from $5000 to $14000 depending on your
support and node needs and provide access to Ansible Tower.